
Velocio PLCs now work with InduSoft
Reasons to use InduSoft
Create advanced User Controls
Log Data and events
Remotely monitor and control systems
Create systems with multiple Velocio PLCs and other brands of PLCs
InduSoft offers a Free 40 hour trial of their software (InduSoft Web Studio). Click here to register and download.
To Connect to your Velocio PLC, you’ll need Firmware 1.09 Beta or greater.
You’ll need to link tags to Modbus Addresses using vBuilder.
InduSoft Setup:
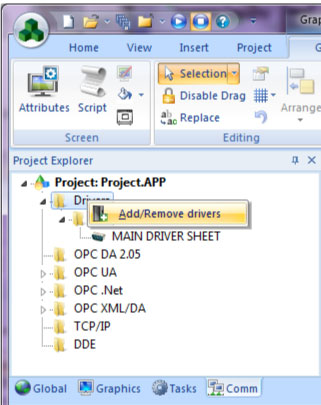
After creating project, go to the Comm tab. Right-click the ‘Driver’ folder. Then Click ‘Add/Remove drivers’
 Then Add the ‘MODBU’ driver and click ‘OK’
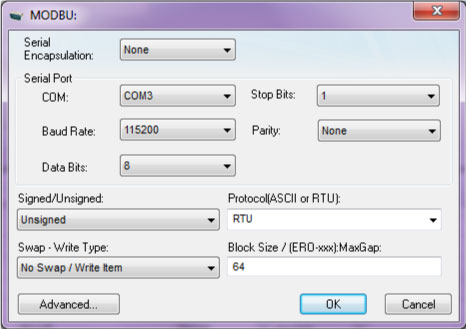
Right Clicking on the MODBU folder on the earlier shown Comm tab, will allow you to select ‘settings’ Displayed on the left is how you should set them up. Your COM port will likely be different. To find your Comm port, go to Windows’ ‘Device Manager’. Expand ‘Ports (COM & LPT)’. If your Velocio PCL is plugged in, you should see ‘VelocioComm’ listed along with a COM number. Use this number.
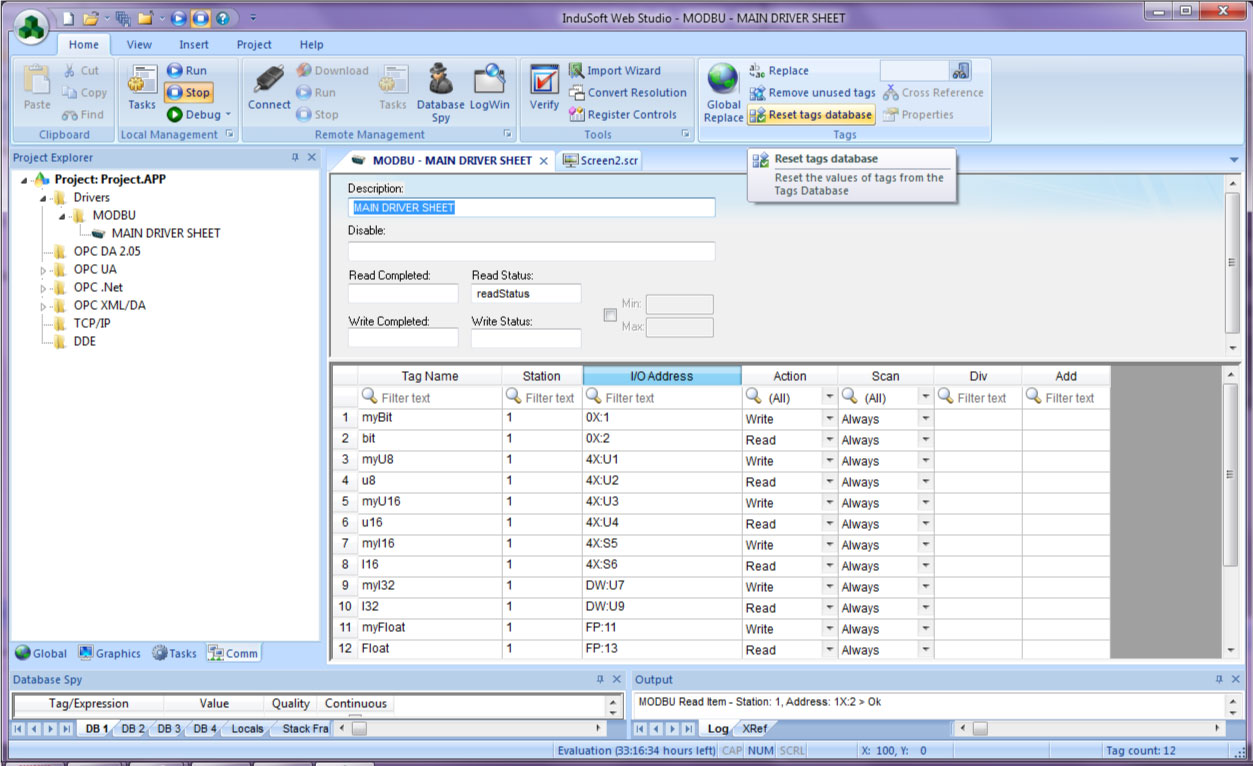
Double Clicking on your newly created driver sheet.
On the Left, is displayed a image of some Tags that have been linked to InduSoft.
The ‘Station’ is the ‘Modbus PLC ID#’ from vBuilder’s Modbus tool.
The ‘I/O Address’ is where you link Tags to their Modbus addresses.
Use the Prefix:
- 0x for bit tags
- 4x for ui8, ui16 and i16 tags
- DW for i32 tags
- FP for float tags
follow this with a ‘:’
Then
- for ui8 and ui16 type ‘U’ to signify unsigned.
- for i16 and i32 type ‘S’ to signify signed
Finally, type the Modbus address you set your tag as inside vBuilder.
The ‘Action’ column will tell InduSoft if you want to Read/Write the value. If writing a value, make sure you’ve got the Tag set as ‘Writable’ inside the Tag tool in vBuilder.